
Vehicle Modifications
Sunroof Drainage Woes: Solving Land Rover Discovery 3 & 4 Leaks
Discovering the Leak: Understanding Sunroof Drainage Issues in Land Rover Discovery 3 and 4
Owning a Land Rover Discovery 3 or 4 is an adventure in itself—these robust vehicles are built to conquer rugged terrains and offer comfort in equal measure. However, even the most adventurous vehicles can have their quirks. One common issue that has caught many owners off guard is the notorious Land Rover sunroof leak. This issue can transform your otherwise dry and cozy cabin into a mini swimming pool after a heavy rain. Let's dive into understanding why this happens and how you can fix it.
Why Does My Land Rover Sunroof Leak?
When your Discovery 3 or 4 starts showing signs of a leaky sunroof, it might feel like the sky is falling. But fear not—understanding the mechanics of how water is supposed to flow can demystify the situation. These vehicles have a sophisticated system designed to channel rainwater away from the roof and out of the vehicle through drain tubes. Unfortunately, these tubes can get clogged with debris like leaves and dirt, or they might suffer from wear and tear over time, leading to leaks.
The Science Behind Sunroof Drainage
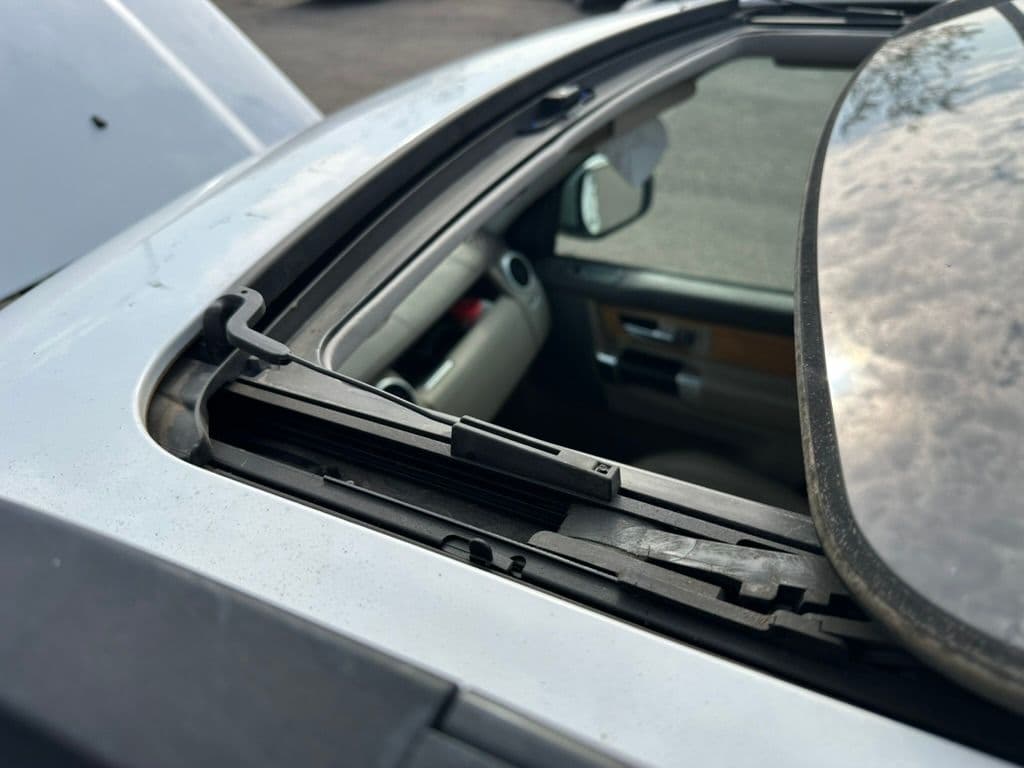
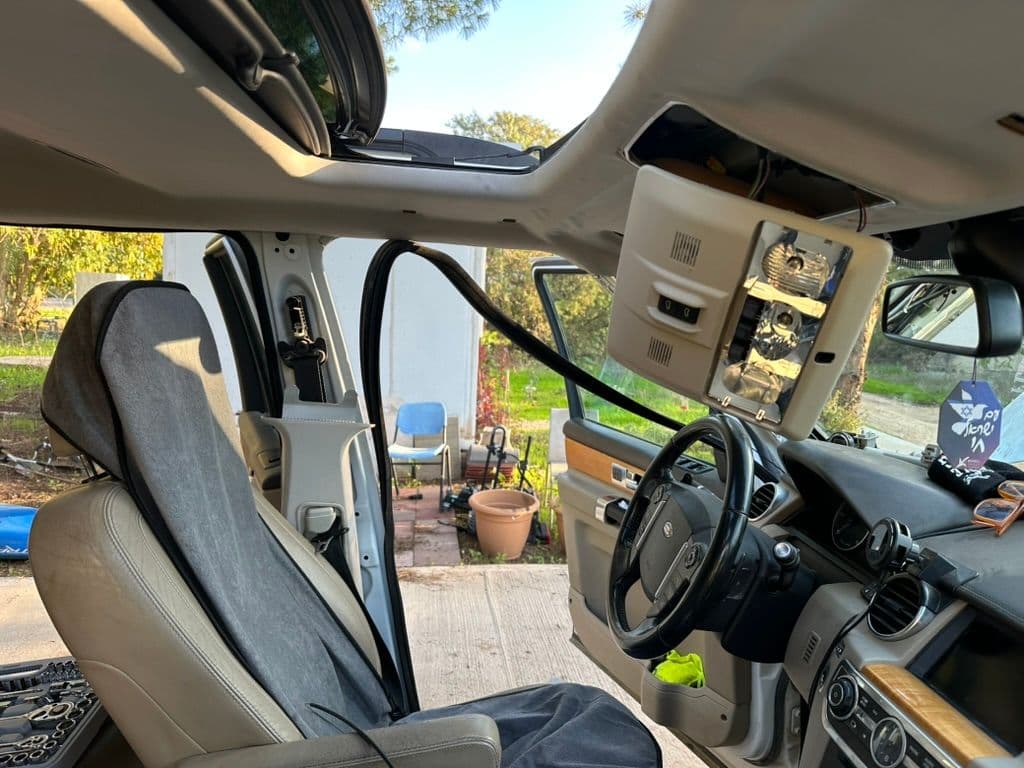
At the heart of the drainage system is a series of channels and tubes that work together to manage water flow efficiently. These components are strategically placed to catch and direct water, preventing it from seeping into the cabin. The front tubes typically run down the A-pillars, while the rear tubes extend towards the back of the vehicle. This setup is designed to keep even heavy rainfall from turning your vehicle’s interior into a soggy mess. Understanding this layout can give you an edge when troubleshooting and fixing leaks.

The Role of the Sunroof Seal
While the drain tubes do the heavy lifting, the sunroof seal plays a pivotal role in preventing leaks. This rubber seal lines the perimeter of the sunroof, providing an initial barrier against water ingress. Over time, exposure to the elements can cause the seal to degrade, compromising its effectiveness. Regular inspection and maintenance of this seal can prevent minor issues from escalating into significant problems.
Common Signs of a Sunroof Leak
Before you start dismantling your beloved vehicle, it's crucial to confirm that the sunroof is indeed the culprit. Common signs include:
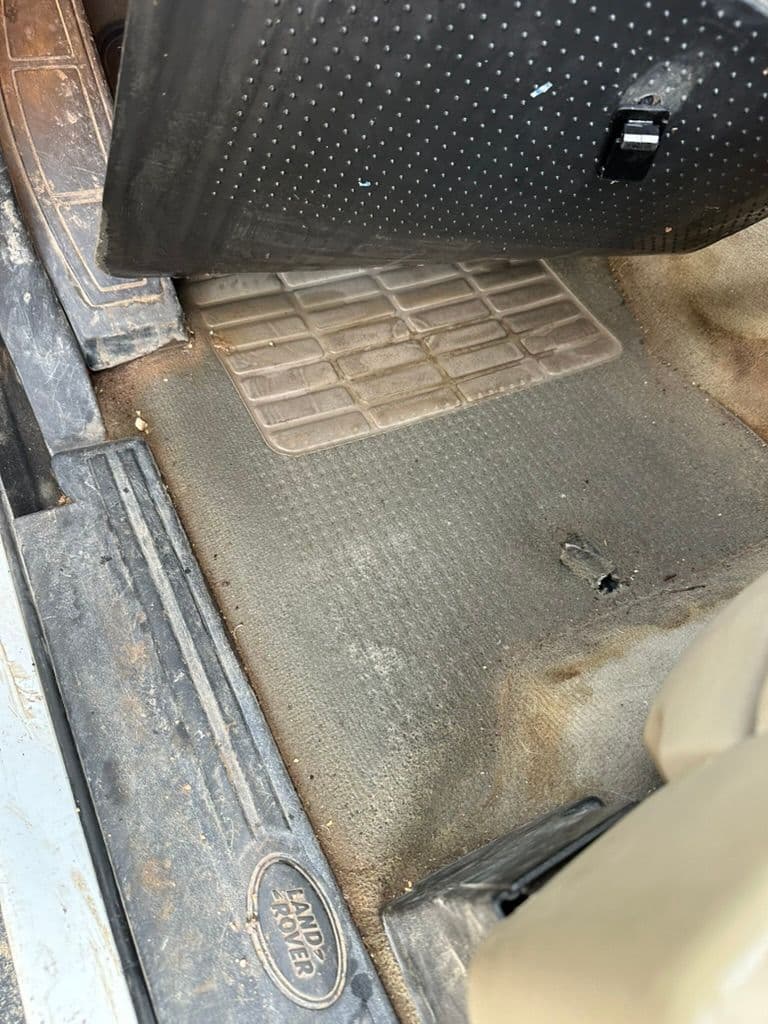
- Water stains on the headliner
- Soggy carpets
- A musty smell inside the cabin
- Water pooling in unexpected places, particularly after washing your vehicle or a downpour
Hidden Symptoms You Might Miss
While obvious symptoms are easy to spot, some signs of a leaking sunroof can be more subtle. You may notice:
- Fogged-up windows more frequently, even in mild weather conditions
- Increased humidity levels inside the vehicle due to undetected water ingress
- Erratic behavior of electrical components, as moisture can interfere with wiring and connections
Diagnosing the Problem: Clogging and Damage
Once you suspect a leak, the next step is to diagnose the problem. Clogging is a frequent offender. A simple way to test for this is to pour a small amount of water into the sunroof's drainage channels and observe whether it drains quickly and completely. If the water doesn't drain, you've likely found your issue. Additionally, inspect the sunroof seals for any visible damage or wear, as these can also allow water to seep through.
Advanced Diagnostic Techniques
For a more thorough diagnosis, consider using a flexible borescope camera. This tool allows you to visually inspect the inside of the drainage tubes, helping to identify stubborn clogs or damage that might not be apparent from the outside. Moreover, using a dye test could reveal leaks by adding a visible color to the water, allowing you to trace the flow and pinpoint any unexpected exits.
Tools You'll Need for the Job
Embarking on a DIY repair requires some preparation. Gather a few basic tools:
- Crosshead screwdriver
- Torx T20 screwdriver
- Silicone sealant
- Shop vacuum (to clear out debris from clogged drains)
- Replacement drain tube (like the EEH500100 front drain tube for Discovery 3 and 4)
Pro Tips for Tool Selection
When choosing tools, opt for those designed for automotive use. A set of plastic trim removal tools can be invaluable for accessing interior components without causing damage. If you’re using compressed air to clear clogs, ensure it’s regulated to avoid accidentally damaging the tubes. Additionally, consider investing in a small, portable work light to illuminate hard-to-see areas, making your repair efforts more precise and efficient.
Step-by-Step Guide to Fixing the Leak
1. Accessing the Drain Tubes
To access the sunroof drain tubes, you’ll need to carefully remove certain interior components like sun visors and trim pieces. This process requires gentle handling to avoid damaging clips and connectors.
2. Clearing the Clogs
Using a shop vacuum or compressed air, clear out any debris from the drain tubes. This step is crucial to restore proper water flow. Be thorough—sometimes the clog can be stubborn and require a bit of persistence.
3. Inspecting and Replacing Drain Tubes
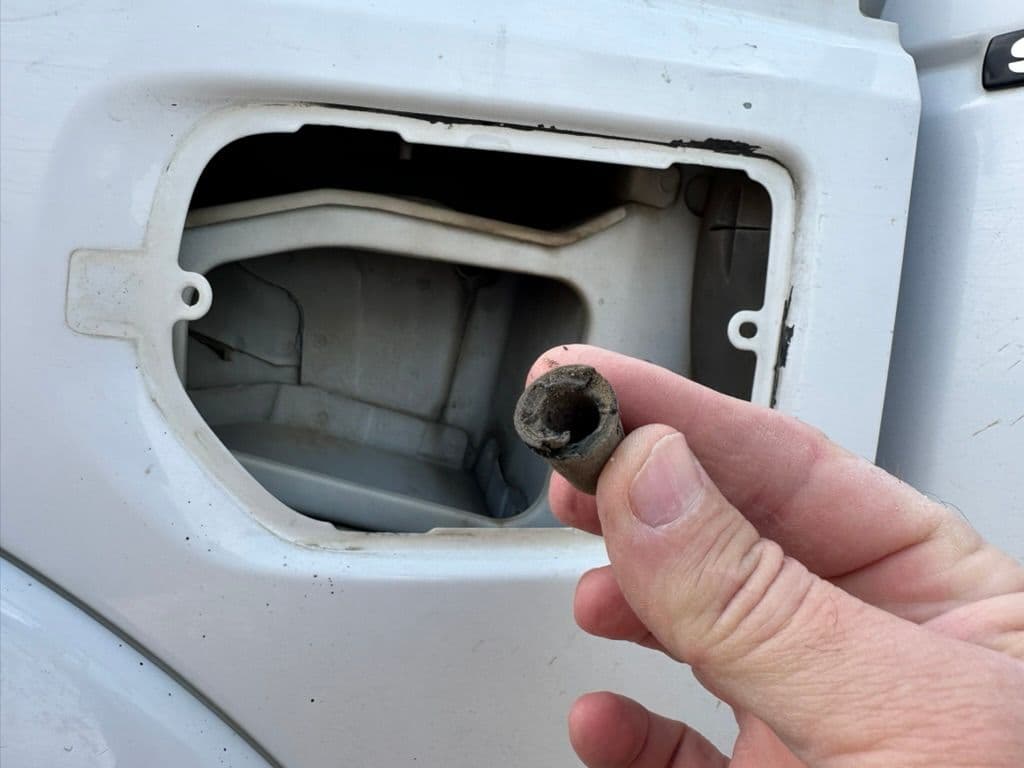
If the tubes are damaged or split, they’ll need replacing. This might sound daunting, but with the right part—like the EEH500100 front drain tube for Discovery 3 and 4—installation is straightforward. Simply remove the old tube and fit the new one in place.
Detailed Step-by-Step Process
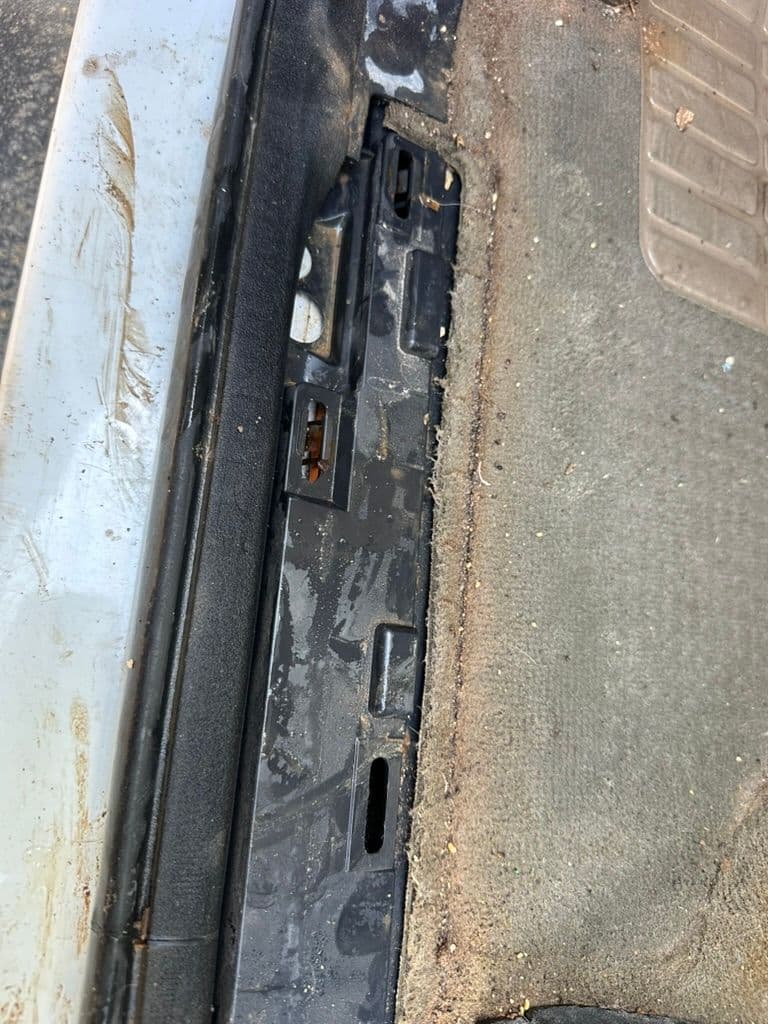
- Remove Interior Trim: Begin by gently prying off the trim pieces around the sunroof and A-pillars. Use your plastic trim tools to avoid scratching.
- Locate Drain Tubes: Identify the front and rear drain tubes within the vehicle’s framework. They are typically visible once the trim is removed.
- Test Drainage: Pour water into the sunroof and observe the flow. If it stagnates, proceed with clearing the tubes.
- Clear Blockages: Use the shop vacuum or compressed air to dislodge debris. For persistent clogs, a flexible wire or specialized cleaning tool can help break through the obstruction.
- Inspect Tubes and Seals: Look for cracks or breaks in the tubes, and check the condition of the sunroof seal. Replace any components as needed.
- Reassemble: Once repairs are complete, carefully reattach the trim pieces, ensuring all clips and connectors are secure.
Tips for Preventative Maintenance
Once you've remedied the immediate problem, it’s wise to implement a few maintenance tips to prevent future issues. Regularly inspect and clean the sunroof's drainage channels, especially if you frequently park under trees. Consider applying a silicone sealant to reinforce the seals and further protect against leaks.
Creating a Maintenance Schedule
To stay ahead of potential issues, develop a maintenance routine:
- Monthly Inspections: Check the sunroof and drainage channels for visible debris or damage.
- Quarterly Cleaning: Use compressed air to clear out the tubes, even if no leaks are apparent.
- Annual Seal Check: Inspect the sunroof seal for signs of wear, replacing it if necessary. Applying a UV-protectant to the rubber can extend its life.
Where to Find Replacement Parts
Finding the right parts is essential for a successful repair. Reputable suppliers like LR Parts offer specific components such as the EEH500100 drain tube, ensuring compatibility and quality. They also provide international shipping, making it easier for Land Rover enthusiasts worldwide to maintain their vehicles.
Navigating the Parts Market
When sourcing parts, prioritize quality and compatibility. While genuine parts are often recommended, high-quality aftermarket options can also be viable. Always verify part numbers and compatibility with your specific vehicle model. Engaging with online communities can provide recommendations and insights into supplier reliability.
DIY or Professional Help: Making the Call
While many of these repairs are manageable as a DIY project, don't hesitate to seek professional help if you’re uncomfortable with any step. The complexity of the sunroof mechanism and the potential for water damage means it’s crucial to get it right.
Evaluating When to Seek Help
Consider the following factors when deciding whether to DIY or hire a professional:
- Complexity of the Issue: If the problem involves extensive repairs beyond your comfort level, professional assistance may be wise.
- Available Tools: Ensure you have the necessary tools and materials before starting. Lacking these may necessitate external help.
- Time Constraints: If time is of the essence, a professional can often complete the work more swiftly and efficiently.
Real-World Experiences: Learn from Fellow Land Rover Owners
Learning from others who have faced the same issues can be invaluable. Online forums and communities like LandyZone are rich with shared experiences, troubleshooting tips, and encouragement. Engaging with these communities not only aids in solving your problem but also connects you with fellow enthusiasts.
Case Studies and Success Stories
Consider this real-world scenario: John, a Land Rover owner, noticed water pooling in his footwell. After consulting with the LandyZone community, he discovered a cracked drain tube was the culprit. Following advice from peers, he replaced the tube and applied a sealant to prevent future leaks. Sharing his success story, John highlighted the importance of community support in tackling automotive challenges.
FAQs: Addressing Common Concerns
How to fix a sunroof leak in a Land Rover Discovery?
- Begin by clearing the drainage tubes of any debris. If the tubes are damaged, replace them with new ones designed for your model. Inspect and reinforce seals with silicone as needed.
What are the common causes of sunroof leaks in Discovery 3 and 4?
- Clogged drainage tubes and worn-out seals are the usual suspects. Regular maintenance can prevent these issues.
Where to find replacement parts for Land Rover sunroof drainage?
- Suppliers like LR Parts offer genuine replacement parts suitable for your vehicle, with international shipping available.
DIY guide for repairing sunroof leaks in Discovery models?
- Follow our step-by-step guide to diagnose and repair your sunroof leaks. Ensure you have the necessary tools and parts before starting.
Steps to prevent water drainage issues in Land Rover sunroofs?
- Regularly clean the drainage system and inspect seals for wear. Use silicone sealant to reinforce seals and consider consulting professional services for comprehensive checks.
What should I do if water damage has already occurred?
- Immediately dry the affected areas using towels or a wet/dry vacuum. If water has reached electrical components, consult a professional to assess and repair any damage.
Conclusion: Embracing the Adventure of Ownership
Owning a Land Rover Discovery 3 or 4 is about embracing both the highs and the occasional maintenance challenges. By understanding your vehicle’s quirks and addressing issues like sunroof leaks head-on, you ensure it remains both a reliable companion and a source of joy. Remember, every repair is an opportunity to connect more deeply with your vehicle, making each adventure even more rewarding. So, grab your tools, and let’s keep the journey dry and delightful!

Community
Join the conversation
No comments yet. Be the first to share your thoughts!
Leave a comment
Keep tinkering
More adventure experiments

Revamp Your Ride: Upgrade the Infotainment in Your 15-Year-Old Car
Breathe new life into your 15-year-old 4x4 with a modern infotainment upgrade. Ready to transform your drives into a tech-savvy experience?

Dead Battery Lockout: 7 Ways to Unlock Your Car
Stuck outside your car? Don't panic! Discover 7 clever ways to unlock your car and regain access to your belongings. Ready to get back on the road?
The Ultimate Guide to Seasonal 4x4 Trail Adventures: Finding Your Perfect Off-Road Time
Discover the thrill of seasonal off-roading! Each season offers unique adventures and challenges—are you ready to find your perfect 4x4 trail experience today?"